| HIFI-FORUM » Surround & Heimkino » Allgemeines » 🟢🟡🔴 One audio 3D Speaker s... | |
|
|
||||
🟢🟡🔴 One audio 3D Speaker setup for all: A solution for Auro-3D, Dolby Atmos ...+A -A |
||||
| Autor |
| |||
|
binap
Inventar |
#1
erstellt: 21. Mai 2019, 18:27

|
|||
|
*** WICHTIGER HINWEIS *** WICHTIGER HINWEIS *** WICHTIGER HINWEIS *** Englische Version als PDF-Download in der FB-Gruppe HEIMKINO UND 3D-SOUND erhältlich: Aktuell: Version 5.0 (14.12.2020) Heimkino und 3D-Sound  *** WICHTIGER HINWEIS *** WICHTIGER HINWEIS *** WICHTIGER HINWEIS *** Englische Übersetzung des Beitrags: Direkter Link zur deutschen Version: Ein Audio-3D-Lautsprecher-Setup für alle: Eine Lösung für Auro-3D, Dolby Atmos und DTS:X Version 4.22 (last edited 08.07.2020) wird nicht mehr aktualisiert) 1. Introduction For all home cinema enthusiasts who like to experiment, I would like to present here a loudspeaker setup that is intended as a solution for the Height layer that can play back all currently available audio 3D formats ; Auro-3D, Dolby Atmos and DTS:X. This loudspeaker setup can be used with all currently available audio 3D formats since it is within the specs of each of those 3D audio format. Based on the availability of less movie content in Auro-3D versus Dolby Atmos, there might be some arguments against a loudspeaker setup that supports playback of Auro-3D only. Link: Overview Auro-3D titles - MovieLink: Overview Auro-3D titles - MusicHowever, there is much to say when comparing the Auro-3D movies versus Dolby Atmos. Patrick Schappert ( www.Grobi.TV ) did many research and got feedback from many clients that the sounds coming from above in an Atmos movie are very limited. This is completely different with Auro-3D that is based on a different approach ; Auro-3D is delivering a vertical coherent sound field (see further) that allows a much more natural use of elevated sounds (like in nature where most source sounds and reflections are located between ear-level and about 30° elevation, exactly where Auro-3Ds vertical stereo field is defined).Additionally, Auro-3D has the most advanced and very powerful upmixer called AuroMatic® which, in addition to "DTS: Neural X", can be used excellently for the playback of conventionally stereo or surround formats over a 3D audio speaker setup. The additional height information is then calculated from the existing signals of the channels using certain algorithms and distributed to the supported height loudspeakers. The overall immersive sound experience is often better and more natural compared to native sound mixes of object based formats. The result is, as usual, very dependent on one's own hearing sensation. The great advantage of the Auromatic® over Neural X, however, is its ability to influence and adjust upmixing in 16 stages and by selecting three different room sizes. For me personally this possibility is already a big incentive to continue using Auro-3D or the AuroMatic, because I use the upmixer very often. Especially if the native track doesn't offer the desired or expected effects in the heights layer, the AuroMatic can still provide some surprising effects. Whether you like it or not is a matter of taste, as mentioned above; I like it very much. 2. Auro-3Ds vertical coherent sound field all around the listener All Auro-3D speaker layouts up to Auro 26.1 as designed by its inventor Wilfried Van Baelen, are based on a vertical coherent sound field all around the listener. Hundreds of tests were done by him in 2005 to understand better how the coherence in the vertical axis works for our brain totally different compared to the horizontal axis. This has to do with the fact that our hearing system is horizontally oriented (we are very sensitive for time differences between left and right ear). We dont have an ear on the top of our head to capture the vertical time differences. As such, our brain is less sensitive for sounds coming from above and additionally, most important sound sources and its 3D reflections are not located there. The result of Wilfrieds research was put in a picture that has been discussed in the workshop Surround Sound with Height (chaired by Kimio Hamasaki, inventor of the 22.2 NHK format) at the AES convention in Paris and San Francisco in 2006 and also in other conventions like Tonmeister Tagung in 2008 (Leipzig Germany). 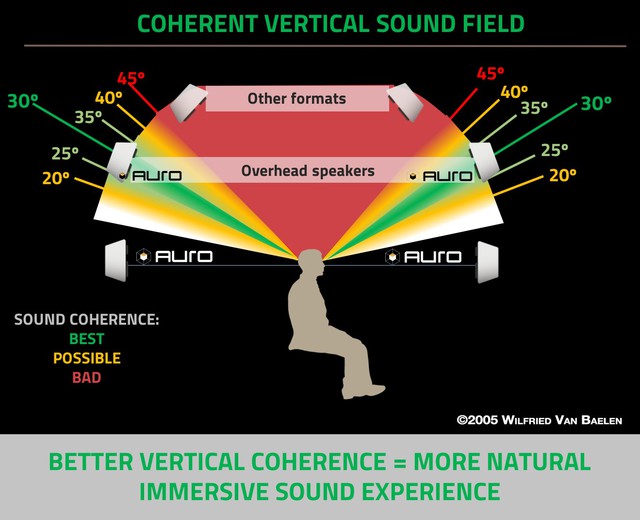 Figure 1 Coherent vertical sound field If the angle of two speakers located above each other is too big, it loses its vertical coherence which means that the sound coming from the two speakers are perceived as two different sources, even if there is a natural coherence in the source material (like ambiances etc..). 3. How does the vertical coherence differ from the horizontal coherence? Sitting in the sweet-spot of a typical horizontal stereo speaker setup in a 60° angle, sounds can experienced as if they can travel from left to right or coming from a location where no speaker is installed. This is called phantom image. Now our hearing system is horizontally oriented. Humans are very sensitive for time differences between left and right ear. Wilfried mentioned in his lecture that the speed from a pulse on our ears going to the cortex in our brain (where the left and right ear information comes together) takes only 4 to 5 micro seconds (millionth of a second). He said that is the same wave length as 200 up to 250kHz sample. As such human beings can experience time differences (spatial information) up to 200kHz and this seems to be almost the same for young and old people. 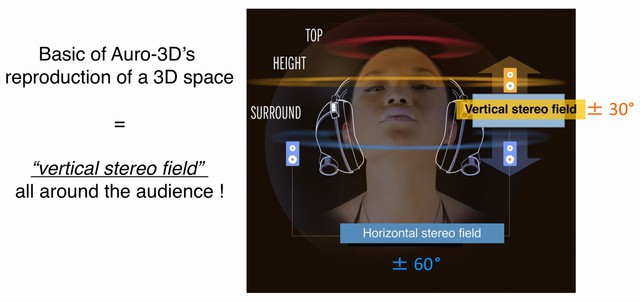 Figure 2 Creation of vertical stereo field Wilfrieds research resulted for him into a better understanding of the coherence in the vertical axis and how such coherence can be achieved like a vertical stereo field. The results were the basic of all his speaker layouts that create in the most efficient way the most natural immersive sound. More speakers doesnt mean that the sound is more natural, the opposite is rather true because more speakers means also more potential comb filtering which results in a lesser reproduction of the sound timbre (color) which is still the most dominant factor in sound quality tests.
(quoted by Wilfried Van Baelen during the Surround with Height workshop, AES Paris & San Francisco in 2006) 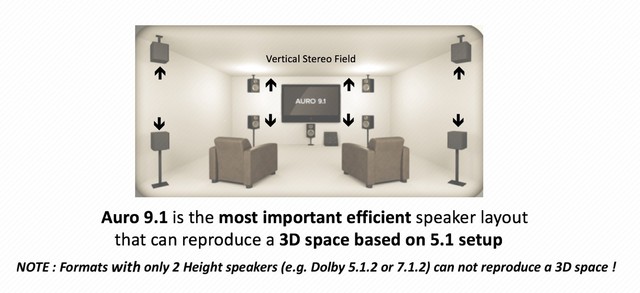 Figure 3 Auro 9.1 speaker layout 4. THREE-layered AURO-3D versus TWO-layered Dolby ATMOS speaker layouts? Although Wilfried Van Baelen inspired many others with his Auro-3D speaker layouts that he presented already at the AES conventions in 2006 (Paris and San Francisco), other players on the market came later unfortunately with other speaker layout proposals leading to a non-compatibility between the different systems. Dolby Atmos came with a 2 layered system (while Auro-3D is based on a 3 layered system) with the speakers placed by Dolby overhead (almost directly above your head). As such this speaker placement of Dolby creates a bad coherence in the vertical axis which means that even if the sound sources are recorded in a coherent natural sound field (like ambiances), it will be perceived as two different sources and not as the natural coherence we are used to experience in nature. Most efficient way to split the vertical axis following Wilfrieds research is using 3 layers. It can be although achieved with 2 layers in small rooms in which the 3rd layer can be generated as a phantom source of Auros quadraphonic height layer. 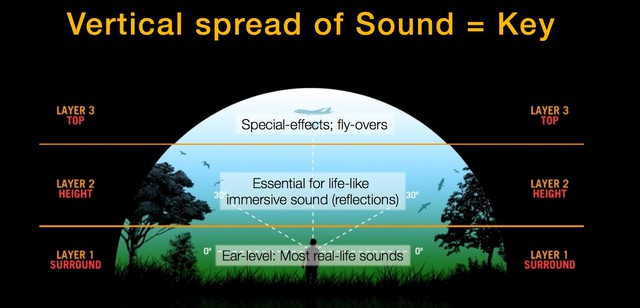 Figure 4 Vertical spread of sound This spread of sound in the vertical axis resulted in the speaker layout that he designed for cinema theaters (Auro 11.1 up to AUROMAX 26.1). It creates coherent sound fields in the vertical axis in front and all around the audience, creating also a much larger sweet-spot experience. 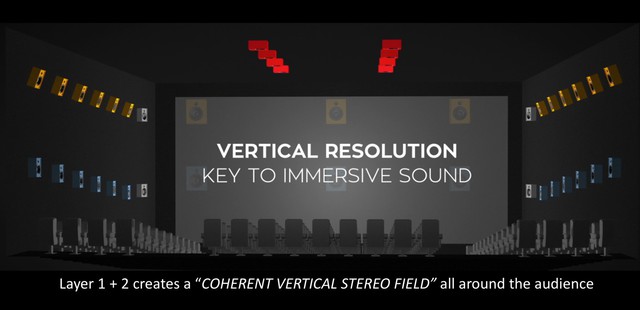 Figure 5 Vertical resolution 5. Auro-3Ds vertical stereo field on screen as part of the formats concept. Auro-3D has also a coherent vertical stereo field on screen which is unique to the Auro-3D format. It allows more depth and transparency coming from the screen channels as well as more coherence with the objects on screen. Most sound energy is coming from the screen channels so it really makes sense to go for the best screen sound which is based on this vertical stereo field on screen. It will additionally create more place for dialogue which is enhancing its intelligibility, also important because the dialogue track is still in immersive sound movies the backbone of each mix. 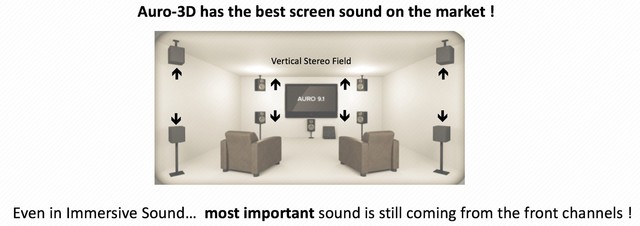 Figure 6 Front channels usage The same concept of the vertical stereo field around the audience goes for Auro-3D into home cinema. Even an Auro 9.1 speaker layout creates a total compatibility of the immersive experience from a big cinema theater into a small home cinema or even a TV. Wilfried mentioned that even in cinema theaters where a 30° angle in the vertical axis is mostly impossible for the screen channels, it is better to have a 10° angle with 2 layers on screen compared to the traditional one layer (as Dolby Atmos and DTS:X). The transparency that can be created by the vertical plane of sound on the screen is just amazing. Some key engineers in Hollywood found that one of the biggest advantages of Auro-3D format while it enhances the screen sound in which now hundreds of sounds are coming from just a few channels creating so much comb-filtering and sounds getting masked. Spreading those sounds create more transparency an easier for our brain to analyze the complex sound field. In complex action scenes, very often are many details of the music track getting masked by the loud sound effects. The ability to spread those sounds create more emotion because the music has more clarity and gets more impact. So if people just think that by placing the height speakers in between the recommended Dolby Atmos specs (45 to 55°) and the Auro-3D specs (25 to 35°) to achieve a good compromise for both formats, they make a mistake in their thinking because: 1)they kill the vertical natural coherence and as such will not achieve a natural immersive sound as intended by the creators of Auro-3D content. 2)they will not have a coherent sound field around the screen which might result in very funny effects. The sounds which were meant to be on the top of the screen, might suddenly sound too much overhead (this can be very strange with e.g. music which is very often well present in Auro-3Ds height channels). 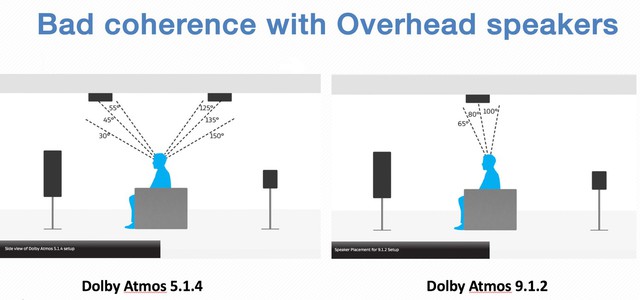 Figure 7 Dolby Atmos Overhead speaker layouts In case if only 2 overhead speakers used, Dolbys specs show an ideal 80° angle. In case 4 overhead speakers are used the angles are ideally between 45 and 55° front and 125° and 135° back. The good news is that Dolby expanded later their specs with the 30° angle as known from Auro-3D (see dotted line in the 5.1.4 design). Note also that formats with 2 overhead speakers only (like Dolby/DTS 5.1.2 or 7.1.2 or 9.1.2) are NOT able to reproduce a 3D space for which at least Auro 8.0 is required (2 quadraphonic layers above each other with ideally an angle of 30° above ear level position of the lower layer) which is like a cube with in each corner a speaker (NB. the cube is used for Auros logo). 6. Rectangular based versus circle based Additionally the difference is also the setup in which Dolby Atmos speaker layouts are based on a rectangular shape while Auro-3D is based on a circle (as it was defined by the 5.1 ITU standard). 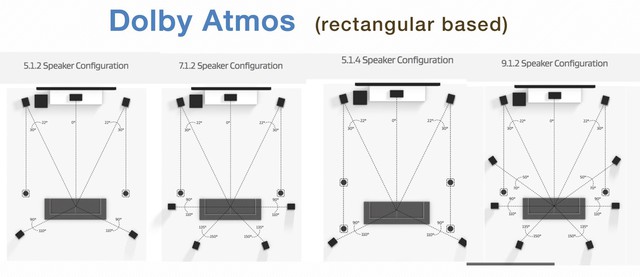 Figure 8 Rectangular based system layouts: Dolby Atmos 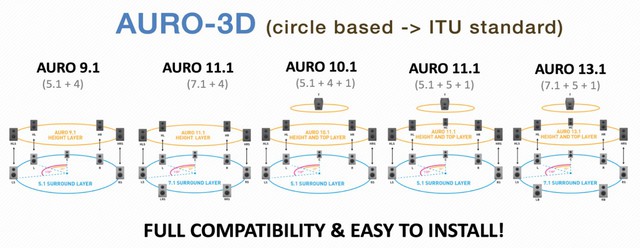 Figure 9 Circle based system layouts: Auro-3D 7. Tilt of the elevated speakers Another difference between Dolby Atmos and Auro-3D is the direction of the elevated (height or overhead) speakers. Dolby Atmos is directing the vertical directions of the speakers to the listeners head while Auro-3D is having the crossing point just above the listeners head in order to create more spatial effect as well as a larger sweet-spot (more people can hear the same immersive sound experience as intended by the creators).  Figure 10 heights crossing point above listeners position with Auro-3D 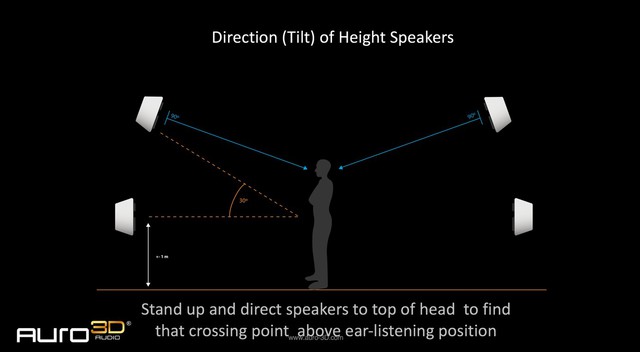 Figure 11 direction of the elevated speakers with Auro-3D Auro-3D is ideally built with a 5.1 setup in the lower layer and with Front Heights and Surround Heights in the upper layer. The Heights loudspeakers are classically mounted vertically above the loudspeakers of the lower layer. For the listening position, a height angle of 30 degrees should be observed if possible, taking into account the remarks as mentioned above. But 30° on ITU (distance of each speaker is the same) results in a smaller vertical same angle when seated at 2/3 position of the room (as this is typical in many home cinema theaters). For the above reason, Auro-3D allowed to put the Height Front speakers in the ceiling as long as the distance of the Height speaker is not shorter to the listener position as the distance of the ear-level speaker. As such, the vertical sound field on screen will be maintained as best as possible.  Figure 12 - 5.1.4 Auro-3D Setup with Surround Heights - © D&M Holdings Inc. All Rights Reserved. As with the other 3D audio formats Dolby Atmos and DTS:X, the speaker configurations supported by Auro-3D can be viewed in the White Papers and Installation Guides: Link: AURO-3D HOME THEATER SETUP Installation GuidelinesLink: Dolby Atmos® Home Theater Installation GuidelinesLink: Trinnov Guide: Recommended Loudspeaker Positions For Screen LoudspeakersThe subsequent expansion of the Auro-3D standard from Surround Heights to Rear Heights is not included here yet. 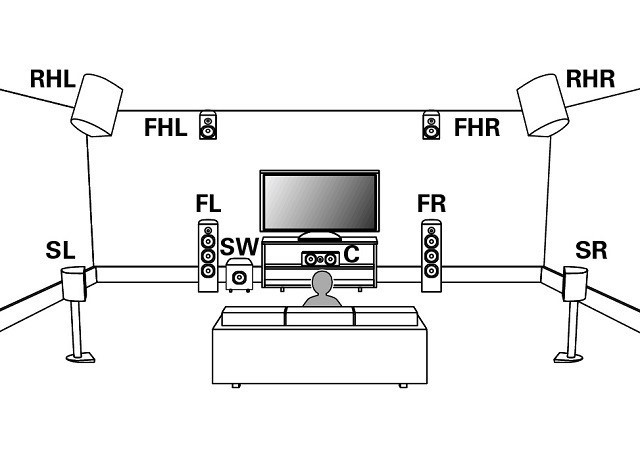 Figure 13 - 5.1.4 Auro-3D Setup with Rear Heights - © D&M Holdings Inc. All Rights Reserved In addition to this classic AURO 9.1 or AURO 10.1 (with additional Top Surround / Voice of God) are based on 5.1 but can also be extended to a 7.1 in the base including the surround back channels. In addition to the four Heights loudspeakers (upper layer) and the Voice of God (top layer), an additional Center Height loudspeaker is added in the top layer, which extends the entire setup to AURO 13.1 and 7.1.6 respectively. In addition, the Auromatic upmixer has the two new setting modes "Speech" and "Movie". The Auromatic can now be applied to native Auro-3D for the first time (Auro 9.1, Auro 10.1) to use all available speakers. Thus a maximum of Auro 13.1 is possible. The function can of course also be deactivated for purists.  Figure 14 - 7.1.6- Auro-3D Setup with Rear Heights - © D&M Holdings Inc. All Rights Reserved. This "extended" Auro-3D is currently used in a few AV-bolides, e.g. the Denon AVC-X8500H, the Marantz AV8805 Preamplifier or the much more expensive Trinnov Altitude AV Sound processoers.In 2020 also Denon AVC-X6700H and Marantz SR8015 will support the 7.1.6-Auro-3D-Layout. 8. Setup with Front Heights and Rear Heights Since I didn't want to give up the possibility to play native Dolby Atmos, a setup had to be built, which is defined for all three formats. Of course, compromises have to be made, but in my opinion they are justifiable and still lead to an excellent result. The setup described in the following is currently implemented for my own home cinema ((Link: [Baubericht] Heimkinobau "Binaptikum 4K" - 7.2.4 Keller-Heimkino für Auro 3D, Dolby Atmos und DTS:X)The configuration has meanwhile been extended to a 7.2.6 setup, again with Auro-3D as well as Dolby Atmos support (as shown above, in Figure 14 - 7.1.6- Auro-3D Setup with Rear Heights). As basis a setup with Front Heights and Rear Heights has to be installed, which is supported in all three formats Auro-3D, Dolby Atmos and DTS:X. Thanks to the subsequent Auro-3D configuration expansion from Surround Heights to Rear Heights, parallel operation with the already defined Front Heights/Rear Heights-Dolby Atmos setup is now also possible. Dolby Atmos also theoretically allows a 5.1.4 configuration with Surround Heights in the AV processor setup, but in Atmos mode the Surround Heights remain unused and sound is only output via the Front Heights. In order to stay as close as possible to the original Auro-3D setup, the elevation angles of the Heights speakers are set to 30 degrees for a compromise solution. If more value is placed on Dolby Atmos, the elevation angle can be increased in favor of an optimal Atmos setup, which recommends 45 degrees as the optimal angle. Other users, for example, suggest values of about 40 degrees elevation angle. But please be careful with such big angles, because the sound immersion depends in relevant way on the room height and screen size. According to Auro-3D specifications, the Heights loudspeakers are to be positioned exactly vertically above the front loudspeakers and surround loudspeakers of the lower layer as standard. Unfortunately, with a standard ceiling height (around 2,00 - 2.30m, only elevation angles near 20 degrees or even less are possible for the front heights at the seating position. Its also clear that the elevation angle depends on the seating position, sweet spot and screen distance. A remedy is to move the front heights in the direction of the listening position, which increases the elevation angle. The original wall position gives way to a ceiling position. Please make sure that the distance "Height speaker seating position" does not differ by more than 10% from the distance "Front speaker - seating position". If the distance at the sitting position to the front loudspeaker is exactly 3.0 meters, for example, the height loudspeaker may have a minimum distance of 2.70 meters (direct distance ear to loudspeaker). Regarding the 10% rule, see also Auro-3D Installation Guidelines, "3.4.1 Low ceiling". In my own home theater, if the heights were positioned directly vertically above the front speaker, only an elevation angle of about 18 degrees would be possible, which is due to my ceiling height of about 2.20 meters. By moving and pulling the heights into the room, they can be brought to the 30 degree elevation required by Auro-3D, but then they have to be positioned on the ceiling. 9. The Different Angles: Elevation Angle vs. Loudspeaker Orientation The elevation angle is the exact position of the loudspeaker measured in height relative to the listening position. In simple terms, this refers to the angle between the horizontal (view to the front) and the line of sight to the high-frequency loudspeaker (line of sight to the high-frequency loudspeaker diagonally above). For details and calculation see separate section "The elevation angle". In contrast, the alignment angle of a loudspeaker must be strictly separated from the elevation angle! This is the angle at which a loudspeaker is angled or twisted towards the listening position. Of course, this angle also depends on the dispersion characteristics of the loudspeaker. For example, there are very wide radiating drivers or drivers with strong bundling. Switchable treble loudspeakers are also worth mentioning here (e.g. Dali Alteco C-1).Deflection and chassis radiation angles can also be added. An elevation angle that only determines the height position of the loudspeaker cannot be influenced, increased or even replaced! The alignment angle of the high-frequency loudspeakers using Auro-3D as an example is clearly defined in the Setup Guide. The listening axes of the Front Heights and Rear Heights tweeters with an elevation height of 30 degrees are aligned in the direction of the listening position so that they cross at ear level of an upright person at the listening position. In a seated position, this corresponds to a crossing point about 20-30cm above the head. 10. The Elevation Angle The elevation angle mentioned above is very important for the construction of the upper layer. This is true for Dolby Atmos and much more for Auro-3D. While Dolby Atmos works with top loudspeakers at 45 to 55 degrees elevation, Auro-3D uses average 30 degrees elevation. In the following, the elevation angle is explained in more detail using Auro-3D as an example: The human ear can locate noises and sounds from the front much better than from above or behind. It is extremely important that the lower layer can still be distinguished from the upper layer acoustically. Auro-3D uses elevation angles of around 30 degrees for the Heights speakers for best immersion results. If this elevation angle drops below 15° degrees, then a too large is located above. If the angle is too small, it can result in more comb filtering especially if the original content recordings were based on a coherent vertical sound field of about 30°. In case only 15° is possible in the front screen channels, then at least a third layer is needed in order to create an immersive 3D sound experience. From the picture below it becomes clear that you can calculate the Elevation angle α (shown in orange in the picture) if you determine the difference between ceiling height/seat height h and additionally the distance in the horizontal direction to the loudspeaker position d. The elevation angle α, which applies to the listening position (spanned between legs d and c), is identical to its alternate angle α, which is located on the ceiling of the high-frequency loudspeaker (spanned between legs b and c). 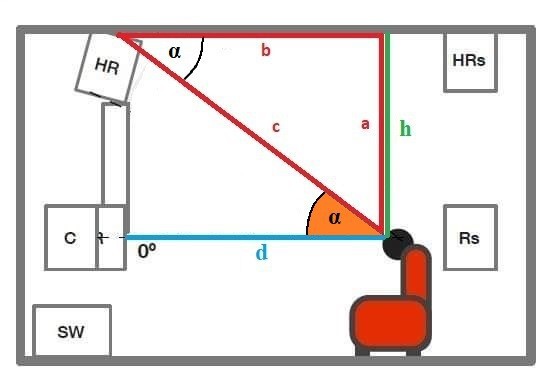 Figure 15 Calculation of the Elevation angle Note: To simplify matters, the exact position of the tweeter in the high-frequency loudspeaker has not been taken as the angle reference point. If, on the other hand, you want to calculate it absolutely accurately, you have to subtract the distance between the tweeter and the ceiling from the height h (or distance a). It applies: Elevation angle α (for two given cathets a and b) (red triangle and red designations): α = arctan (a / b) If a and b are the same length, the elevation angle is 45 degrees (which is the default for Dolby Atmos). Form the equation to get the distance b, how close the heights have to be pulled to the seat. b = a / tan(α) is obtained with a given elevation of 30 degrees for the example Auro-3D: b = a / tan(30°) Since the ceiling height is actually always unchangeable, e.g. 2.40m, and provided that the ears are then in sitting position at e.g. 110cm height: Distance to ceiling h=130cm b = 130cm / 0,57735 = 225cm Consequently, the loudspeakers must be pulled up to 2.25m to the sitting position in order to raise it to 30 degrees elevation. To very quickly check an Auro-3D setup for correct elevation angles or to find the ideal horizontal distance of the Heights speakers to the listening position, you can use the following quick check: 1. Take your preferable sitting listening position (sweet spot). 11. Appendix 1. Direct Link to the original document (german) : Ein Setup für alles: All-In-One-Lösung für Auro 3D, Dolby Atmos und DTS:X2. Impressive interview on the topic by Patrick Schappert (Grobi.TV) with the American web site Audioholics: Overcoming Problems with Bad Immersive Audio Mixes3. Presentation of Roland Krüger (Sound United, german) Von Dolby Atmos bis Auro3D - alles unter einem Hut mit einer Lautsprecherkonfiguration4. Wilfried Van Baelen explains everything around the concept and use of the Auro-3D format. Learn how Auro-3D was born and about its unique benefits. Wilfried Van Baelen explains everything around the concept and use of the Auro-3D format5. GROBI-TV: Live Chat with Wilfried Van Baelen GROBI-TV: Live Chat with Wilfried Van Baelen[Beitrag von binap am 19. Sep 2023, 11:54 bearbeitet] |
||||
|
kobold58
Hat sich gelöscht |
#2
erstellt: 21. Mai 2019, 18:54
|
|||
|
Bei soviel Mathe wirds bei manchem schwierig.  |
||||
|
|
||||
|
binap
Inventar |
#3
erstellt: 21. Mai 2019, 19:09
|
|||
|
Wer es nicht umständlich rechnen möchte, kann die Vereinfachung im letzten Absatz verwenden. Der Post wird noch um einige Grundlagendinge erweitert, ist also noch im Fluss und noch nicht final. [Beitrag von binap am 21. Mai 2019, 19:10 bearbeitet] |
||||
|
kobold58
Hat sich gelöscht |
#4
erstellt: 21. Mai 2019, 19:23
|
|||
|
Trotzdem schon jetzt ein Dankeschön für Deine Mühe, es wird vielen helfen. |
||||
|
BassTrap
Inventar |
#5
erstellt: 21. Mai 2019, 21:56
|
|||
|
Hi, Deine Abhandlung verwirrt, indem Du mehrfach schreibst, Dolby Atmos verwende TOPs bei 45° Elevationswinkel, Auro 3D dagegen Heights bei 30° Elevationswinkel, aber Du schaffst keinen Spagat zwischen den beiden. Der Leser fragt sich, wie die beiden zu vereinen sind, wenn die Elevationswinkel sich unterscheiden. Es sind zudem keine festgemeiselten Winkel, sie haben Toleranzen. Die Lösung wäre, die Atmos TOPs nur am Rande zu erwähnen, dafür aber hervorzuheben, daß auch Atmos Front und Rear Heights kennt, wie auch Auro 3D, jeweils bei 30°. Du solltest Deine Abhandlung didaktisch besser strukturieren, dann wird es kaum mehr Rückfragen geben. Grüße, Markus |
||||
|
binap
Inventar |
#6
erstellt: 21. Mai 2019, 23:56
|
|||
|
Danke für das Feedback. Das zweimalige (work in progress) hast Du aber schon gesehen, oder? Da fehlt noch einiges, was ich genau an der Stelle nachtragen werde. Und natürlich wird das auch noch didaktisch strukturiert. Natürlich ist das von mir empfohlene Setup mein eigenes Setup, welches ich AUro 3D-optimiert mit Front Heights und Rear Heights bei 30 Grad Elevation aufgebaut habe. |
||||
|
binap
Inventar |
#7
erstellt: 22. Mai 2019, 23:56
|
|||
|
Update im ersten Beitrag: Texterweiterungen, Bilder und Neustrukturierung (Work in progress) Feedback ist natürlich willkommen. [Beitrag von binap am 22. Mai 2019, 23:57 bearbeitet] |
||||
|
BassTrap
Inventar |
#8
erstellt: 23. Mai 2019, 00:49
|
|||
|
Sag mal, vom Urheberrecht hast Du aber schon mal was gehört, oder? Die Bilder stammen bis auf eines alle aus einer Denon oder Marantz Bedienungsanleitung. Die hast Du kopiert und hier veröffentlicht, sind aber Copyright © D&M Holdings Inc. All Rights Reserved. |
||||
|
binap
Inventar |
#9
erstellt: 23. Mai 2019, 02:10
|
|||
|
Du hast natürlich Recht. Ich habe die Bilder wieder entfernt. Dann muss es ohne gehen bzw. es wird ein direct Link auf das frei verfügbare jeweilige Online-Manual gesetzt. Danke für den Hinweis. |
||||
|
Klipsch-RF7II
Inventar |
#10
erstellt: 23. Mai 2019, 07:09
|
|||
|
Wobei dadurch aber kein Schaden für D&M entsteht, da eigentlich Werbung für D&M gemacht wird, da die noch die einzigen sind, die im Low- und Mid-End Segment Auro 3D nebst den anderen 3D Soundformaten anbieten. Gehört in die Kategorie rechtlich bedenklich aber wahrscheinlich nicht zu einer Unterlassungsklage führend. Ist auch Gang und Gebe hier im Forum, Manualseiten abzudrucken. End of off-topic. Interressante Ausarbeitung, Binap. Zeichne doch was selber ggfs.  |
||||
|
binap
Inventar |
#11
erstellt: 23. Mai 2019, 11:09
|
|||
|
Anfrage an das Sound United Marketing ist raus, ob ich hier in meinem Beitrag entsprechendes Bildmaterial der Online-Bedienungsanleitungen verwenden darf. |
||||
|
binap
Inventar |
#12
erstellt: 26. Mai 2019, 20:11
|
|||
|
Text Update: Die verschiedenen Winkel: Elevationswinkel vs. Lautsprecherausrichtung |
||||
|
binap
Inventar |
#13
erstellt: 27. Mai 2019, 17:27
|
|||
Freigabe ist erteilt. Ich darf die Bilder aus den Original-Anleitungen verwenden. Es wird ein entsprechender Disclaimer gesetzt. |
||||
|
binap
Inventar |
#14
erstellt: 28. Mai 2019, 01:17
|
|||
|
Update: Konfigurationsbilder samt Disclaimer eingefügt. Bildverwertung mit freundlicher Genehmigung der D&M Holdings Inc. [Beitrag von binap am 28. Mai 2019, 01:17 bearbeitet] |
||||
|
Punzel
Stammgast |
#15
erstellt: 03. Jun 2019, 22:13
|
|||
|
Hallo Binap, ich wollte mich nur kurz für Deinen Beitrag bedanken. Das verstehe sogar ich ... Ich stehe nämlich im Moment genau vor der Entscheidung, wo ich meine FH und SH anbringe. Ich habe mir den Denon 6500 gekauft und, damit ich überall die gleichen Chassis verbaut habe, vier meiner Back Surround Boxen. 1. Frage: Auf dem Bild Deines Kinos sehe ich, dass Du die FH Boxen horizontal mit den Hochtönern nach "innen" angebracht hast. Bringt das irgendwelche klanglichen Vorteile ? Meine Wharfedale SR haben eine etwas eigenwillige Form; die würde ich lieber vertikal mit den Hochtönern nach oben an der Decke anbringen. 2. Frage: Welche Boxenhalter hast Du verwendet ? Danke im voraus für kurzes Feedback. Gruß Chris |
||||
|
binap
Inventar |
#16
erstellt: 03. Jun 2019, 22:22
|
|||
|
Danke für das Feedback.
Die Position war lediglich dem geschuldet, was mir besser gefallen hat. Ich hatte diese Anordnung mit Hochtöner nach innen allerdings auch schon in dieser Art in anderen Räumen gesehen.
ELAC Deckenhalterung CB 25 für WS1425, WS1665 [Beitrag von binap am 03. Jun 2019, 22:22 bearbeitet] |
||||
|
jan_reinhardt
Inventar |
#17
erstellt: 22. Jun 2019, 16:19
|
|||
|
ich wünsche mir noch einen Abschnitt, der auf typische Wohnraum- und Optik-Limitationen eingeht. Weil nicht jeder ein Kellerkino hat (sondern ein Wohnzimmer und z.B. die Gattin bei der Möblierung mitredet). Welche Lösungen wirken besser, wenn man an der Front- und Rückwand Heights verwendet, die nicht an der Decke montiert und nicht zum Hörplatz vorgezogen werden können? Baut man die 1. Fronts und Rears auf gleicher Höhe an, werden sie verschiedene Elevationswinkel haben (weil die Couch nicht mittig im Raum steht, sondern näher an der Rückwand). Möchte man 2. gleichen Elevationswinkel, ergeben sich unterschiedlich hoch an der Wand montierte Heights. Was ist besser? Sofern man 1. umsetzt, kann man mit Varianten spielen. (Beispielhaft) Front 30 Grad Elevation, Rear 50 Grad Front 25 Grad, Rear 44 Grad Wie entsteht das beste Gesamtergebnis? |
||||
|
Nemesis200SX
Inventar |
#18
erstellt: 22. Jun 2019, 16:41
|
|||
|
Generell kann man sagen vorne ist wichtiger als hinten. Nach hinten hört der Mensch nicht so genau, da werden Abweichungen eher verziehen. [Beitrag von Nemesis200SX am 22. Jun 2019, 17:20 bearbeitet] |
||||
|
jan_reinhardt
Inventar |
#19
erstellt: 22. Jun 2019, 17:22
|
|||
|
Generell Danke, und zu welchen konkreten Antworten auf #17 führt das? |
||||
|
Nemesis200SX
Inventar |
#20
erstellt: 22. Jun 2019, 17:25
|
|||
|
Front 30 Rear 50 ist besser als Front 25 Rear 44 |
||||
|
BassTrap
Inventar |
#21
erstellt: 22. Jun 2019, 17:36
|
|||
Das wird Dir niemand sagen können, weil das niemand in genau diesen Konstellationen in Deinem Raum ausprobiert hat. Weicht jemand bei sich Daheim von den Herstellerempfehlungen ab und behauptet, es klinge toll, ist diese Behauptung nicht viel wert, wenn er dasselbe Tonmaterial noch nie bei Aufstellung nach Herstellerempfehlungen gehört hat. Und hat jemand Daheim seine Boxen exakt nach nach Herstellerempfehlungen angebracht, kommt es immer noch auf die Raumakustik (Geometrie, Reflexionen, Hall) an, ob es dort so klingt wie es klingen soll. |
||||
|
jan_reinhardt
Inventar |
#22
erstellt: 22. Jun 2019, 18:56
|
|||
|
Genau das ist die Killer-Antwort, mit der Du jeden Thread tot machst. Unter diesem Aspekt wäre im gesamten HiFi-Forum kaum noch was zu diskutieren. P.S. Ja, das mag jetzt hart für Dich klingen. Aber achte doch mal selber drauf, wie oft und in welchen anderen Threads jemand dieses Ding rausholt. Und wie Du diese Leute dann wahrnimmst. [Beitrag von jan_reinhardt am 22. Jun 2019, 19:41 bearbeitet] |
||||
|
binap
Inventar |
#23
erstellt: 22. Jun 2019, 19:27
|
|||
|
So richtig hilfreich sind manche Antworten nicht wirklich... da werden eher mögliche Urheberrechtsverletzungen thematisiert als auf die eigentlichen Inhalte einzugehen...  Ich hab wirklich das Gefühl, dass das gezielte Torpedieren immer mehr zunimmt hier... [Beitrag von binap am 22. Jun 2019, 19:28 bearbeitet] |
||||
|
jan_reinhardt
Inventar |
#24
erstellt: 22. Jun 2019, 19:40
|
|||
|
das Bildchen aus der Denon-Anleitung hab ich in den letzten 3 Jahren schon selbst in diverse andere Threads gepostet, hab daher heftigst gegrinst bei #8 |
||||
|
BassTrap
Inventar |
#25
erstellt: 22. Jun 2019, 20:15
|
|||
Grins nur weiter, bis Dich einer verklagt. Dann vergeht Dir Dein Grinsen. |
||||
|
jan_reinhardt
Inventar |
#26
erstellt: 22. Jun 2019, 20:54
|
|||
|
Ist das Deine fachjuristische Expertenmeinung? |
||||
|
JokerofDarkness
Inventar |
#27
erstellt: 22. Jun 2019, 21:29
|
|||
Das war doch schon immer so, aber einige Leute tun sich halt besonders und vor allem geballt hervor. Das ist aber auch der Grund, wieso ich vor längerem solche Arbeiten und Hilfestellungen im Großen und Ganzen eingestellt habe, da bei solchen Subjekten oftmals einfach nur Theorie zählt und nicht der praktische Einsatz. |
||||
|
BassTrap
Inventar |
#28
erstellt: 22. Jun 2019, 21:35
|
|||
Nicht mögliche sondern tatsächliche.
Hab' ich etwa nicht ... vergiß es. |
||||
|
BassTrap
Inventar |
#29
erstellt: 22. Jun 2019, 21:40
|
|||
|
Ich weiß nicht, was Ihr habt. Was ist denn so falsch an meinen Aussagen in Beitrag 21? Bisher könnt Ihr nur daran rummosern aber kein einziges qualifiziertes Gegenargument liefern. |
||||
|
binap
Inventar |
#30
erstellt: 24. Jun 2019, 00:26
|
|||
|
Update: Erweiterung Punkt 2. Setup mit Front Heights und Rear Heights |
||||
|
HinterMailand
Inventar |
#31
erstellt: 24. Jun 2019, 12:52
|
|||
|
Hi Binap, erst mal vielen dank für deine Mühe die Infos hier zu sammeln und zur Verfügung zu stellen. Du schreibst unter Punkt 2: ...Die ursprüngliche Wandposition weicht einer Deckenposition. Dabei ist darauf zu achten, dass sich der Abstand Height-Lautsprecher-Sitzposition nur um maximal 10% von der Entfernung Front-Lautsprecher-Sitzposition unterscheiden darf. Beträgt die Entfernung an der Sitzposition zum Front-Lautsprecher z.B. genau 3,0 Meter, dann darf der Height-Lautsprecher minimal 2,70 Meter Entfernung haben (direkte Strecke Ohr zum Lautsprecher). Bezüglich der 10%-Regel siehe auch Auro 3D Installation Guidelines, 3.4.1 Low ceiling. Das ist mir jetzt neu ... ist das mit den 10% dann nur bei Auro relevant oder auch bei DTSX und Atmos? Meine Heigh-LS musste ich aufgrund der niedrigen Deckenhöhe auch Richtung Hörplatz ziehen (gerade, auf der Flucht zu den Front), und habe somit unter Einhaltung des Elevationswinkels einen Abstand von ca. 2,5m. Der Abstand zu meinen Fronts ist aber knapp 4m. Oder verstehe ich da grad was falsch? |
||||
|
binap
Inventar |
#32
erstellt: 24. Jun 2019, 13:24
|
|||
|
Genau so ist es in den Auro 3D Guidelines beschrieben. Diese 10%-Regel gilt bei niedrigen Decken und es wird sogar empfohlen, die Entfernung dann zu verringern und eine einhergehende Verkleinerung des Elevationswinkels auf 25 Grad in Kauf zu nehmen. Der Grund scheint zu sein, dass der Height-Lautsprecher zu stark ortbar ist, wenn er sich im Verhältnis zu den Fronts zu nah an der Abhörposition befindet. Deshalb sollte man diese 10% Unterschied nicht überschreiten. [Beitrag von binap am 24. Jun 2019, 13:27 bearbeitet] |
||||
|
HinterMailand
Inventar |
#33
erstellt: 25. Jun 2019, 11:18
|
|||
|
OK, danke. Da ich ja kein Auro habe/nutze kann ich sie ja dann bzgl. DTSX und Atmos ignorieren. |
||||
|
Tron2.9
Inventar |
#34
erstellt: 02. Jul 2019, 20:51
|
|||
|
Hallo zusammen, habe jetzt auch mal nach der Anleitung gerechnet. Kann mal bitte jemand, der hier sicherer im Sattel sitzt, meine Ergebnisse überprüfen? Ziel: Ausschliesslich Auro (Upmixer) Abstand zur Front: 3,80m Abstand nach Hinten: 1,40m (hier ist die Tiefe der Heights mit je ca. 20cm schon abgezogen, der Raum ist insgesamt 5,60m lang) Deckenhöhe: 2,89m Ohrhöhe: 1,00m bzw. Ohr-Decke: 1,89m Ergibt für mich: 1. Die Front-Heights müssen in 3,27m Entfernung vom Sitzplatz an die Decke 2. Die Back-Heights müssen in 1,81m Höhe an die Rückwand Vorrausgesetzt das Errechnete stimmt, hätte ich mit diesem Aufbau (trotz "Asynchronität") keine Probleme. Verbesserungen/ Berichtigungen/ Alternativen/ eine Bestätigung werden dankbar entgegen genommen. Eine geringfügige Veränderung der Distanz der Couch nach vorne wäre möglich- aber nicht unbedingt. Habe eine grosse Leinwand vor und möchte nicht mitten im Bild sitzen. Vielen Dank! |
||||
|
jan_reinhardt
Inventar |
#35
erstellt: 02. Jul 2019, 22:40
|
|||
|
ja, beide Anbaupositionen ergeben 30 Grad Elevationswinkel vorne und hinten. Dann hängen die LS auf 1,10 Höhenunterschied vorne zu hinten. Dass das unproblematisch ist, kann ich nicht bestätigen, habe es aber nicht selbst ausprobiert. Andere User berichten, dass z.B. bei der Helikopter-Demo der Hubi eben nicht an der Decke kreist, sondern über Berge und durch Täler fliegt... |
||||
|
BassTrap
Inventar |
#36
erstellt: 02. Jul 2019, 22:57
|
|||
1.89/3.27 = tan(30.03°), paßt Die 3.27m gehen dann nach links bzw. rechts schräg rüber und nicht gerade nach vorne und die Front-Heights dann jeweils seitlich davon montiert?
Meinst Du schräg nach hinten, wo die Back-Heights hängen werden oder gerade nach hinten?
Wenn schräg, dann paßt's, wenn gerade, hingen sie tiefer als 30°. |
||||
|
Tron2.9
Inventar |
#37
erstellt: 03. Jul 2019, 08:43
|
|||
|
Erstmal Danke für´s schnelle Antworten. Das mit "schräg" verstehe ich nicht ganz. Die Entfernungen sind in gerader Linie vom Hörplatz zur jeweiligen Wand angegeben. Die Front- und Rear-Hights kommen natürlich nicht in dieser geraden Linie an die Wand, sondern links und rechts davon- nähmlich über ihre Front- und Rear-Pendants. Dass diese zusätzliche Dimension in die Berechnung mit einfliessen muss, ist mir neu (wobei sich ja der grundsätzliche Winkel dadurch nicht verändern sollte)- bin für eine nähere Erklärung aber dankbar  |
||||
|
binap
Inventar |
#38
erstellt: 03. Jul 2019, 08:53
|
|||
|
Natürlich gilt der Winkel immer in Richtung der Lautsprecher. Wenn der Lautsprecher z.B. der rechte Front Height wäre, dann darfst Du natürlich nicht einfach gerade nach vorne messen, sondern Richtung Lautsprecher. Wenn Du nach vorne misst, muss der Lautsprecher dann auf die entsprechende Kreisbahn mit dem gleichen Radius gesetzt werden. [Beitrag von binap am 03. Jul 2019, 08:55 bearbeitet] |
||||
|
Tron2.9
Inventar |
#39
erstellt: 03. Jul 2019, 10:16
|
|||
|
Ha, jetzt hats geklickt! Vielen Dank (jetzt heisst es: neu messen...). |
||||
|
Mullidulli
Ist häufiger hier |
#40
erstellt: 26. Jul 2019, 07:54
|
|||
|
Ich möchte mein 7.1-Setup mit vier Dali Alteco C-1 auf 7.1.4 erweitern mit der Kompromisslösung und einem Elevationswinkel von etwa 40°, also mit Front- und Rear Heights, wobei ich die "Front Heights" als Tops anbringen möchte, jedoch im AVR als Front Heights deklariere. Ich habe gerade gelesen, dass die Dali Alteco C-1 bei Einstellung Up einen Abstrahlwinkel von 21° haben und bei Einstellung Down einen Winkel von 25°. Der Elevationswinkel berechnet sich ja einzig von der Hörposition zum Hochtöner. Aber dabei muss der Abstrahlwinkel doch eine sehr große Rolle spielen, oder etwa nicht? Ich habe momentan im Sinn, die Alteco C-1 direkt an die Decke zu montieren, um nicht auch noch eine Deckenhalterung kaufen zu müssen. Ich möchte sie dann als Front Heights deklarieren, auch wenn es in dem Fall Tops sind. Muss ich bei 21-25° Abstrahlwinkel nicht auch einen ganz anderen Elevationswinkel berücksichtigen? Ich verstehe das dann so, dass zwar. z.B. ein Elevationswinkel von 40° (wegen Kompronmisslösung) gegeben wäre, aber wenn die Lautsprecher jetzt im 25° Abstrahlwinkel von der Decke aus Töne von sich geben, ist er dann wirklich ortbar? Kann man das mit den Alteco C-1 denn so machen? Wenn ich das richtig verstanden habe, sollen die Töne ja einige cm über der Ohrhöhe abstrahlen. Ich habe mir die ganzen Berechnungen jetzt mehrmals durchgelesen, aber ich verstehe noch nicht ganz, in wiefern der Abstrahlwinkel und/oder das Einwinkeln zum Hörplatz eine Rolle spielt. Hier ist es doch ein sehr großer Unterschied, ob ich die Alteco C-1 oder normale Satelliten an der Decke habe? [Beitrag von Mullidulli am 26. Jul 2019, 08:06 bearbeitet] |
||||
|
binap
Inventar |
#41
erstellt: 26. Jul 2019, 08:37
|
|||
|
Die Elevationshöhe eines Lautsprechers zur Sitzposition hat rein gar nichts mit dem Abstrahlwinkel des Lautsprecherchassis oder mit der Ausrichtung des Lautsprechers, seiner Eindrehung oder Abwinklung, zu tun. Ist doch auch logisch: wenn der Elevatiosnwinkel nur 15 Grad beträgt, dann kannst Du das ja nicht mit 25 Grad Abstrahlverhalten korrigieren. Der Lautsprecher hängt dann immer noch viel zu tief, um eine akustische Trennung von oben und vorne unten zu gewährleisten. Das Eindrehen ist lediglich die Kür für ein korrekt aufgebautes Setup mit den richtigen Elevationswinkeln. Auro 3D sieht vor, dass die Hörachse des Heights so auszurichten ist, dass der Kopf in stehender Postion getroffen wird. Bei Atmos sind die Höchtöner in Richtung Hörsposition auszurichten (gibt da ja die Einbau-Tops mit eindrehbaren Hochtöner) Aber all das hat nichts mit der eigentlichen Position in der Höhe relativ zur Abhörposition zu tun. |
||||
|
Mullidulli
Ist häufiger hier |
#42
erstellt: 26. Jul 2019, 08:48
|
|||
|
Das heißt also im Klartext, der Aufbau mit Altecos an der Decke ist quasi unmöglich ohne die Möglichkeit, diese auf die Hörposition eindrehen zu können. Also muss man gezwungenermaßen immer schwenk-/einwinkelbare Decken-/Wandhalterungen einsetzen. [Beitrag von Mullidulli am 26. Jul 2019, 08:51 bearbeitet] |
||||
|
binap
Inventar |
#43
erstellt: 26. Jul 2019, 08:53
|
|||
|
Wie kommst Du darauf? Natürlich ist der Aufbau auch mit den Dali Altecos möglich. Nochmal: Das Ausrichten ist die Kür. Das kann man gerne tun, wenn der Rest stimmt. Ich würde die Altecos halt dann mit der kürzeren Seite an der Decke befestigen und nicht mit der längeren Seite. Die Schalterstellung sollte dann auf Up stehen, damit der Lautsprecher nicht noch zusätzlich nach unten abstrahlt. 
[Beitrag von binap am 26. Jul 2019, 08:59 bearbeitet] |
||||
|
jan_reinhardt
Inventar |
#44
erstellt: 26. Jul 2019, 17:43
|
|||
Warum die Alteco C-1, warum nicht z.B. die SVS Prime Elevation? Welche Argumente machen Deine Entscheidungsfindung aus? |
||||
|
Mullidulli
Ist häufiger hier |
#45
erstellt: 31. Jul 2019, 12:34
|
|||
Da meine übrigen Lautsprecher aus der Dali Oberon Reihe sind. Man soll doch nach Möglichkeit beim selben Hersteller bleiben. Was bewegt dich zur Annahme, dass diese SVS Prime Elevation hier die bessere Wahl wären? Zumal sie weitaus mehr kosten. [Beitrag von Mullidulli am 31. Jul 2019, 12:38 bearbeitet] |
||||
|
BassTrap
Inventar |
#46
erstellt: 31. Jul 2019, 13:32
|
|||
Warum? Meine beiden Fronts sind von einem anderen wie der Center und die Surrounds und die von einem anderen als die Heights und die von einem anderen als die Subs. |
||||
|
JokerofDarkness
Inventar |
#47
erstellt: 31. Jul 2019, 13:43
|
|||
Am Besten sogar bei der gleichen Serie und im Idealfall nimmt man für alles sogar den gleichen LS. Ist an der Decke natürlich so nicht umsetzbar. |
||||
|
jan_reinhardt
Inventar |
#48
erstellt: 31. Jul 2019, 18:32
|
|||
Weitaus mehr ist ja nun durchaus relativ. Ein Paar Prime Elevation kostet EUR 130 mehr als ein Paar Alteco C-1. Und da es sich ohnehin um Luxusartikel handelt (kein Mensch braucht ein Setup mit Heights an den Wänden), und die Lautsprecher einige Jahre herhalten werden, sehe ich das weitaus ziemlich gelassen. Dass die Prime Elevation besser wären, wollte ich nicht sagen. Sondern stelle mir genau diese Frage grade selber: Alteco C-1 oder Prime Elevation, und ich wollte es eben nicht am Preisunterschied festmachen. |
||||
|
Mullidulli
Ist häufiger hier |
#49
erstellt: 01. Aug 2019, 08:02
|
|||
Ja gut, so gesehen ist es nicht so viel. Ich wollte vielmehr sagen, ob sich der Aufpreis objektiv lohnt? Die Dali Altecos würde ich im 4'er-Set für 500,- bekommen beim Händerler meines Vertrauens. Dafür würde ich aber nur 2 Prime Elevation bekommen. |
||||
|
jan_reinhardt
Inventar |
#50
erstellt: 01. Aug 2019, 19:06
|
|||
|
4 Stück für 500,00 klingt gut! Wo denn? (gerne auch per PN) Aber es müsste halt mal jemand die Prime Elevation im direkten Vergleich gg die Altecos antreten lassen. Das Ergebnis interessiert mich. |
||||
|
hardy.som
Stammgast |
#51
erstellt: 01. Aug 2019, 20:32
|
|||
Ich denke im normalen Filmbetrieb wirst du da keinen Unterschied hören, LS Serientreue hin oder her.... Nimm dir die, die dir am Besten gefallen und in den Raum passen oder am besten anbringen kannst. Wichtiger ist ein gutes Bass Management für die entsprechende Trennung der Height LS. |
||||
| ||||

|
|
||||
| Das könnte Dich auch interessieren: |
|
🟢🟡🔴 Ein Audio-3D-Lautsprecher-Setup für alle: Eine Lösung für Auro-3D, Dolb... binap am 20.10.2019 – Letzte Antwort am 19.09.2023 – 141 Beiträge |
|
3D One for All Setup mit Deckeneinbaulautsprechern christopher1 am 28.01.2022 – Letzte Antwort am 03.02.2022 – 7 Beiträge |
|
5.1.4 One for all setup Sinnvoll erweitern [Endzeit] am 14.11.2023 – Letzte Antwort am 22.01.2024 – 3 Beiträge |
|
🟢🟡🔴 Sammlung an Links zu Heimkino-Bauthreads binap am 16.07.2014 – Letzte Antwort am 10.06.2024 – 71 Beiträge |
|
ALL FOR ONE Kameleon mas2002 am 17.02.2005 – Letzte Antwort am 18.02.2005 – 2 Beiträge |
|
Auro 3D Lautsprecher einwinkeln Floo1 am 18.06.2022 – Letzte Antwort am 19.06.2022 – 3 Beiträge |
|
Aufbau Dolby Atmos oder Auro-3D 2ndMorpheus am 02.01.2020 – Letzte Antwort am 03.01.2020 – 5 Beiträge |
|
Der Auro 3D und Dolby Atmos FAQ roterteufel81 am 11.04.2018 – Letzte Antwort am 03.12.2018 – 11 Beiträge |
|
Dolby Atmos for Headphones routing froes am 31.01.2024 – Letzte Antwort am 10.02.2024 – 11 Beiträge |
|
Von Atmos zu Auro 3D Natanielsands am 18.01.2020 – Letzte Antwort am 19.01.2020 – 18 Beiträge |
Anzeige
Produkte in diesem Thread


Aktuelle Aktion


Partner


Top 10 Threads in Allgemeines der letzten 7 Tage
- Surround oder Surround Back ?
- Nachfolger von Bose Lifestyle 650 wann?
- Dezibelanzeige im Minus? (Noob-Frage)
- Ist 3dB, 6dB oder 10dB der doppelte Schalldruckpegel (SPL)?
- Kein Ton über HDMI Arc/eArc bei Teufel Cinebar 11, Arc und eArc nicht kompatibel?
- Fernseher verzerrt Ton wie Dämonenstimmen?
- Sprache zu leise, Effekte zu laut. was tun?
- Ein Audio-3D-Lautsprecher-Setup für alle: Eine Lösung für Auro-3D, Dolby Atmos und DTS:X
- Teufel Ultima 40 Aktiv 4.0 - nur selten Surround :(
- Wo ist Plus / Minus bzw Rot / Schwarz ... Brauche Hilfe!!!
Top 10 Threads in Allgemeines der letzten 50 Tage
- Surround oder Surround Back ?
- Nachfolger von Bose Lifestyle 650 wann?
- Dezibelanzeige im Minus? (Noob-Frage)
- Ist 3dB, 6dB oder 10dB der doppelte Schalldruckpegel (SPL)?
- Kein Ton über HDMI Arc/eArc bei Teufel Cinebar 11, Arc und eArc nicht kompatibel?
- Fernseher verzerrt Ton wie Dämonenstimmen?
- Sprache zu leise, Effekte zu laut. was tun?
- Ein Audio-3D-Lautsprecher-Setup für alle: Eine Lösung für Auro-3D, Dolby Atmos und DTS:X
- Teufel Ultima 40 Aktiv 4.0 - nur selten Surround :(
- Wo ist Plus / Minus bzw Rot / Schwarz ... Brauche Hilfe!!!
Top 10 Suchanfragen
Forumsstatistik
- Registrierte Mitglieder931.117 ( Heute: 3 )
- Neuestes MitgliedDavidAachen
- Gesamtzahl an Themen1.564.754
- Gesamtzahl an Beiträgen21.865.501
